


Table of contents
- 📌 Introduction
- 🚀 Getting Started with VideoSDK
- 🛠️ Install VideoSDK
- 🎥 Essential Steps to Implement Video Calling Functionality
- 🔍 Integrate Picture-in-Picture Feature
- 🔚 Conclusion
📌 Introduction
Picture-in-Picture (PiP) is a user interface feature that allows a secondary window to appear alongside the main window or screen. This secondary window often displays video content, allowing users to watch videos or make video calls while conducting other tasks. The PiP window remains visible and resizable, giving users uninterrupted access to the video content when switching between programs or windows.
Use Case and Effectiveness
The use case for PiP mode is diverse, spanning from business meetings to personal video conversations. Professionals can use PiP mode to participate in video conferences while additionally examining documents, taking notes, or collaborating on projects. This feature boosts productivity by reducing the need to move between apps or windows, allowing for smooth multitasking during meetings.
In personal contexts, PiP mode allows for ongoing conversation with friends and family during video chats. Users may have video discussions while browsing the internet, reading emails, or using other apps on their smartphones. This flexibility improves the user experience by making it easier and more efficient to manage many activities at the same time. In this tutorial, we'll look at how to include Picture-in-Picture mode into a React application using VideoSDK.
🚀 Getting Started with VideoSDK
To take advantage of the chat functionality, we must use the capabilities that the VideoSDK offers. Before diving into the implementation steps, let's ensure you complete the necessary prerequisites.
Create a VideoSDK Account
Go to your VideoSDK dashboard and sign up if you don't have an account. This account gives you access to the required Video SDK token, which acts as an authentication key that allows your application to interact with VideoSDK functionality.
Generate your Auth Token
Visit your VideoSDK dashboard and navigate to the "API Key" section to generate your auth token. This token is crucial in authorizing your application to use VideoSDK features.
For a more visual understanding of the account creation and token generation process, consider referring to the provided tutorial.
Prerequisites and Setup
Before proceeding, ensure that your development environment meets the following requirements:
VideoSDK Developer Account (Not having one?, follow VideoSDK Dashboard)
Basic understanding of React.
Make sure Node and NPM are installed on your device.
Basic understanding of Hooks (useState, useRef, useEffect)
React Context API (optional)
Follow the steps to create the environment necessary to add video calls to your app. You can also find the code sample for Quickstart here.
Create a new React App using the below command.
$ npx create-react-app videosdk-rtc-react-app
🛠️ Install VideoSDK
It is necessary to set up VideoSDK within your project before going into the details of integrating the Screen Share feature. Installing VideoSDK using NPM or Yarn will depend on the needs of your project.
- For NPM
$ npm install "@videosdk.live/react-sdk"

//For the Participants Video
$ npm install "react-player"
- For Yarn
$ yarn add "@videosdk.live/react-sdk"

//For the Participants Video
$ yarn add "react-player"
You are going to use functional components to leverage React's reusable component architecture. There will be components for users, videos and controls (mic, camera, leave) over the video.
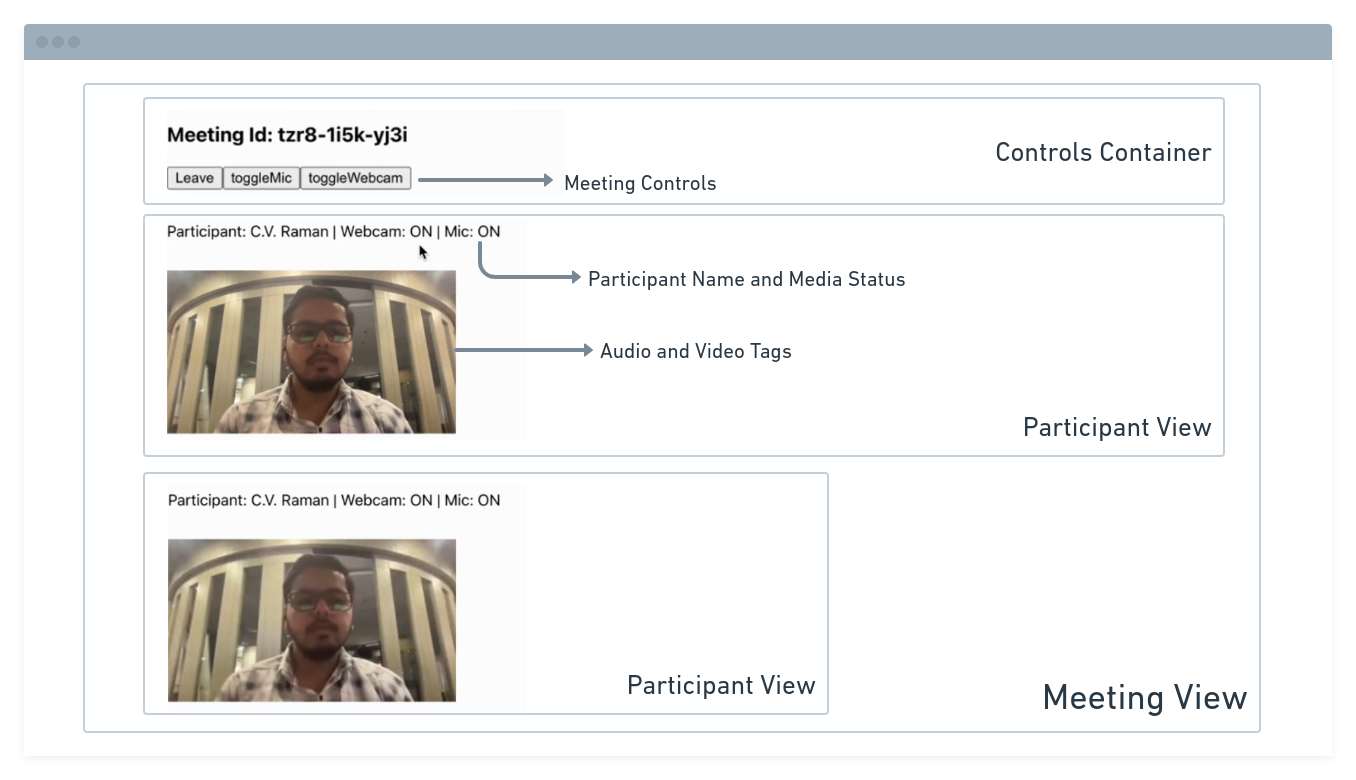
App Architecture
The App will contain a MeetingView component which includes a ParticipantView component which will render the participant's name, video, audio, etc. It will also have a Controls component that will allow the user to perform operations like leave and toggle media.
You will be working on the following files:
API.js: Responsible for handling API calls such as generating unique meetingId and token
App.js: Responsible for rendering
MeetingViewand joining the meeting.
🎥 Essential Steps to Implement Video Calling Functionality
To add video capability to your React application, you must first complete a sequence of prerequisites.
Step 1: Get started with API.js
Before moving on, you must create an API request to generate a unique meetingId. You will need an authentication token, which you can create either through the videosdk-rtc-api-server-examples or directly from the VideoSDK Dashboard for developers.
//This is the Auth token, you will use it to generate a meeting and connect to it
export const authToken = "<Generated-from-dashbaord>";
// API call to create a meeting
export const createMeeting = async ({ token }) => {
  const res = await fetch(`https://api.videosdk.live/v2/rooms`, {
    method: "POST",
    headers: {
      authorization: `${authToken}`,
      "Content-Type": "application/json",
    },
    body: JSON.stringify({}),
  });
  //Destructuring the roomId from the response
  const { roomId } = await res.json();
  return roomId;
};
Step 2: Wireframe App.js with all the components
To build up a wireframe of App.js, you need to use VideoSDK Hooks and Context Providers. VideoSDK provides MeetingProvider, MeetingConsumer, useMeeting, and useParticipant hooks.
First, you need to understand the Context of Provider and Consumer. Context is primarily used when some data needs to be accessible by many components at different nesting levels.
MeetingProvider: This is the Context Provider. It accepts value
configandtokenas props. The Provider component accepts a value prop to be passed to consuming components that are descendants of this Provider. One Provider can be connected to many consumers. Providers can be nested to override values deeper within the tree.MeetingConsumer: This is the Context Consumer. All consumers that are descendants of a Provider will re-render whenever the Provider’s value prop changes.
useMeeting: This is the meeting hook API. It includes all the information related to meetings such as join/leave, enable/disable the mic or webcam, etc.
useParticipant: This is the participant hook API. It is responsible for handling all the events and props related to one particular participant such as name, webcamStream, micStream, etc.
The Meeting Context provides a way to listen for any changes that occur when a participant joins the meeting or makes modifications to their microphone, camera, and other settings.
Begin by making a few changes to the code in the App.js file.
import "./App.css";
import React, { useEffect, useMemo, useRef, useState } from "react";
import {
  MeetingProvider,
  MeetingConsumer,
  useMeeting,
  useParticipant,
} from "@videosdk.live/react-sdk";
import { authToken, createMeeting } from "./API";
import ReactPlayer from "react-player";

function JoinScreen({ getMeetingAndToken }) {
  return null;
}

function ParticipantView(props) {
  return null;
}

function Controls(props) {
  return null;
}

function MeetingView(props) {
  return null;
}

function App() {
  const [meetingId, setMeetingId] = useState(null);

  //Getting the meeting id by calling the api we just wrote
  const getMeetingAndToken = async (id) => {
    const meetingId =
      id == null ? await createMeeting({ token: authToken }) : id;
    setMeetingId(meetingId);
  };

  //This will set Meeting Id to null when meeting is left or ended
  const onMeetingLeave = () => {
    setMeetingId(null);
  };

  return authToken && meetingId ? (
    <MeetingProvider
      config={{
        meetingId,
        micEnabled: true,
        webcamEnabled: true,
        name: "C.V. Raman",
      }}
      token={authToken}
    >
      <MeetingView meetingId={meetingId} onMeetingLeave={onMeetingLeave} />
    </MeetingProvider>
  ) : (
    <JoinScreen getMeetingAndToken={getMeetingAndToken} />
  );
}

export default App;
Step 3: Implement Join Screen
The join screen will serve as a medium to either schedule a new meeting or join an existing one.
function JoinScreen({ getMeetingAndToken }) {
  const [meetingId, setMeetingId] = useState(null);
  const onClick = async () => {
    await getMeetingAndToken(meetingId);
  };
  return (
    <div>
      <input
        type="text"
        placeholder="Enter Meeting Id"
        onChange={(e) => {
          setMeetingId(e.target.value);
        }}
      />
      <button onClick={onClick}>Join</button>
      {" or "}
      <button onClick={onClick}>Create Meeting</button>
    </div>
  );
}
Output

Step 4: Implement MeetingView and Controls
The next step is to create MeetingView and Controls components to manage features such as join, leave, mute, and unmute.
function MeetingView(props) {
  const [joined, setJoined] = useState(null);
  //Get the method which will be used to join the meeting.
  //We will also get the participants list to display all participants
  const { join, participants } = useMeeting({
    //callback for when meeting is joined successfully
    onMeetingJoined: () => {
      setJoined("JOINED");
    },
    //callback for when meeting is left
    onMeetingLeft: () => {
      props.onMeetingLeave();
    },
  });
  const joinMeeting = () => {
    setJoined("JOINING");
    join();
  };

  return (
    <div className="container">
      <h3>Meeting Id: {props.meetingId}</h3>
      {joined && joined == "JOINED" ? (
        <div>
          <Controls />
          //For rendering all the participants in the meeting
          {[...participants.keys()].map((participantId) => (
            <ParticipantView
              participantId={participantId}
              key={participantId}
            />
          ))}
        </div>
      ) : joined && joined == "JOINING" ? (
        <p>Joining the meeting...</p>
      ) : (
        <button onClick={joinMeeting}>Join</button>
      )}
    </div>
  );
}
function Controls() {
  const { leave, toggleMic, toggleWebcam } = useMeeting();
  return (
    <div>
      <button onClick={() => leave()}>Leave</button>
      <button onClick={() => toggleMic()}>toggleMic</button>
      <button onClick={() => toggleWebcam()}>toggleWebcam</button>
    </div>
  );
}Copy
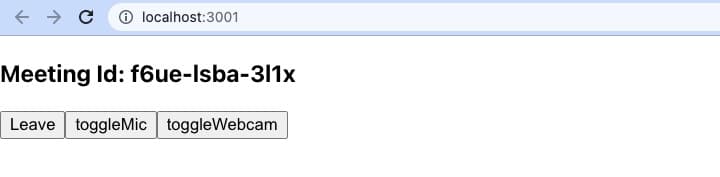
Control Component
Output of Controls Component
Step 5: Implement Participant View
Before implementing the participant view, you need to understand a couple of concepts.
5.1 Forwarding Ref for mic and camera
The useRef hook is responsible for referencing the audio and video components. It will be used to play and stop the audio and video of the participant.
const webcamRef = useRef(null);
const micRef = useRef(null);
Forwarding Ref for mic and camera
5.2 useParticipant Hook
The useParticipant hook is responsible for handling all the properties and events of one particular participant who joined the meeting. It will take participantId as an argument.
const { webcamStream, micStream, webcamOn, micOn } = useParticipant(
  props.participantId
);Copy
5.3 MediaStream API
The MediaStream API is beneficial for adding a MediaTrack to the audio/video tag, enabling the playback of audio or video.
const webcamRef = useRef(null);
const mediaStream = new MediaStream();
mediaStream.addTrack(webcamStream.track);

webcamRef.current.srcObject = mediaStream;
webcamRef.current
  .play()
  .catch((error) => console.error("videoElem.current.play() failed", error));
5.4 ImplementParticipantView
Now you can use both of the hooks and the API to create ParticipantView
function ParticipantView(props) {
  const micRef = useRef(null);
  const { webcamStream, micStream, webcamOn, micOn, isLocal, displayName } =
    useParticipant(props.participantId);

  const videoStream = useMemo(() => {
    if (webcamOn && webcamStream) {
      const mediaStream = new MediaStream();
      mediaStream.addTrack(webcamStream.track);
      return mediaStream;
    }
  }, [webcamStream, webcamOn]);

  useEffect(() => {
    if (micRef.current) {
      if (micOn && micStream) {
        const mediaStream = new MediaStream();
        mediaStream.addTrack(micStream.track);

        micRef.current.srcObject = mediaStream;
        micRef.current
          .play()
          .catch((error) =>
            console.error("videoElem.current.play() failed", error)
          );
      } else {
        micRef.current.srcObject = null;
      }
    }
  }, [micStream, micOn]);

  return (
    <div>
      <p>
        Participant: {displayName} | Webcam: {webcamOn ? "ON" : "OFF"} | Mic:{" "}
        {micOn ? "ON" : "OFF"}
      </p>
      <audio ref={micRef} autoPlay playsInline muted={isLocal} />
      {webcamOn && (
        <ReactPlayer
          //
          playsinline // extremely crucial prop
          pip={false}
          light={false}
          controls={false}
          muted={true}
          playing={true}
          //
          url={videoStream}
          //
          height={"300px"}
          width={"300px"}
          onError={(err) => {
            console.log(err, "participant video error");
          }}
        />
      )}
    </div>
  );
}
You can check out the complete quick start example here.
🔍 Integrate Picture-in-Picture Feature
Picture-in-picture (PiP) is a commonly used feature in video conferencing software, enabling users to simultaneously engage in a video conference and perform other tasks on their devices. With PiP, you can keep the video conference window open, resize it to a smaller size, and continue working on other tasks while still seeing and hearing the other participants in the conference. This feature proves beneficial when you need to take notes, send an email, or look up information during the conference.
This explains the steps to implement the Picture-in-Picture feature using VideoSDK.
PiP Video
All modern-day browsers support popping a video stream out from the HTMLVideoElement. You can achieve this either directly from the controls shown on the video element or by using the Browser API method requestPictureInPicture() on the video element.
Chrome, Edge, and Safari support this browser Web API, however, Firefox has no programmatic way of triggering PiP.
Customize Video PiP with multiple video streams
Step 1: Create a button that toggles the Picture-in-Picture (PiP) mode during the meeting. This button should invoke the togglePipMode() method when clicked.
function Controls() {
  const togglePipMode = async () => {};
  return (
    <div>
      <button onClick={() => togglePipMode()}>start Pip</button>
    </div>
  );
}
Step 2: The first step is to check if the browser supports PiP mode; if not, display a message to the user.
function Controls() {
  const togglePipMode = async () => {
    //Check if browser supports PiP mode else show a message to user
    if ("pictureInPictureEnabled" in document) {

    } else {
      alert("PiP is not supported by your browser");
    }
  };
  return ...;
}
Step 3: Now, if the browser supports PiP mode, create a Canvas element and a Video element. Generate a Stream from the Canvas and play it in the video element. Request PiP mode for the video element once the metadata has been loaded.
function Controls() {

  const pipWindowRef = useRef();

  const togglePipMode = async () => {
    //Check if browser supports PiP mode else show a message to user
    if ("pictureInPictureEnabled" in document) {
      //Create a Canvas which will render the PiP Stream
      const source = document.createElement("canvas");
      const ctx = source.getContext("2d");

      //Create a Video tag which will popout for PiP
      const pipVideo = document.createElement("video");
      pipWindowRef.current = pipVideo;
      pipVideo.autoplay = true;

      //Create a stream from canvas which will play
      const stream = source.captureStream();
      pipVideo.srcObject = stream;

      //Do initial Canvas Paint
      drawCanvas()

      //When Video is ready, start PiP mode
      pipVideo.onloadedmetadata = () => {
        pipVideo.requestPictureInPicture();
      };
      await pipVideo.play();
    } else {
      alert("PiP is not supported by your browser");
    }
  };
  return ...;
}
Step 4: The next step is to paint the canvas with the Participant Grid, which will be visible in the PiP window.
function Controls() {

  const getRowCount = (length) => {
    return length > 2 ? 2 : length > 0 ? 1 : 0;
  };
  const getColCount = (length) => {
    return length < 2 ? 1 : length < 5 ? 2 : 3;
  };

  const togglePipMode = async () => {
    //Check if browser supports PiP mode else show a message to user
    if ("pictureInPictureEnabled" in document) {

      //Stream playing here
      //...

      //When the PiP mode starts, draw the canvas with PiP view
      pipVideo.addEventListener("enterpictureinpicture", (event) => {
        drawCanvas();
      });

      //When PiP mode exits, dispose the tracks that were created earlier
      pipVideo.addEventListener("leavepictureinpicture", (event) => {
        pipWindowRef.current = null;
        pipVideo.srcObject.getTracks().forEach((track) => track.stop());
      });

      //This will draw all the video elements in to the Canvas
      function drawCanvas() {
        //Getting all the video elements in the document
        const videos = document.querySelectorAll("video");
        try {
          //Perform initial black paint on the canvas
          ctx.fillStyle = "black";
          ctx.fillRect(0, 0, source.width, source.height);

          //Drawing the participant videos on the canvas in the grid format
          const rows = getRowCount(videos.length);
          const columns = getColCount(videos.length);
          for (let i = 0; i < rows; i++) {
            for (let j = 0; j < columns; j++) {
              if (j + i * columns <= videos.length || videos.length == 1) {
                ctx.drawImage(
                  videos[j + i * columns],
                  j < 1 ? 0 : source.width / (columns / j),
                  i < 1 ? 0 : source.height / (rows / i),
                  source.width / columns,
                  source.height / rows
                );
              }
            }
          }
        } catch (error) {}

        //If pip mode is on, keep drawing the canvas when ever new frame is requested
        if (document.pictureInPictureElement === pipVideo) {
          requestAnimationFrame(drawCanvas);
        }
      }

    } else {
      alert("PiP is not supported by your browser");
    }
  };
  return ...;
}
Only the participants who have their video turned on, will be shown in the PiP mode.
Step 5: Exit the PiP mode if it is already active.
function Controls() {
  const togglePipMode = async () => {

    //Check if PiP Window is active or not
    //If active we will turn it off
    if (pipWindowRef.current) {
      await document.exitPictureInPicture();
      pipWindowRef.current = null;
      return;
    }

    //Check if browser supports PiP mode else show a message to user
    if ("pictureInPictureEnabled" in document) {
      ...
    } else {
      alert("PiP is not supported by your browser");
    }
  };
  return ...;
}
🔚 Conclusion
This function allows users to multitask while attending a conference, which boosts productivity and convenience. Embracing PiP mode allows you to provide immersive and feature-rich video conferencing solutions that meet the changing expectations of consumers in today's digital ecosystem. Integrating Picture-in-Picture mode into your React application with the VideoSDK helps improve the user experience during video conferencing.
To unlock the full potential of VideoSDK and create easy-to-use video experiences, developers are encouraged to Sign up with VideoSDK today and Get 10000 minutes free to take the video app to the next level.