


Table of contents
- Introduction
- 🚀 Getting Started with VideoSDK
- 🛠️ Install VideoSDK
- 🎥 Essential Steps to Implement Video Calling Functionality
- Integrate Collaborative Whiteboard (Canvas Drawing)
- 🔚 Conclusion
Introduction
Adding a Collaborative Whiteboard feature to your React JS Video Call App not only enhances collaboration but also boosts productivity. This feature allows users to brainstorm ideas, sketch diagrams, and annotate documents in real-time while engaged in video calls. By seamlessly integrating this feature, your app facilitates smoother communication and empowers users to visualize concepts, fostering a more interactive and engaging experience.
Benefits of using Whiteboard:
Enhanced Collaboration: Users can visually illustrate concepts, making communication more effective.
Increased Productivity: Whiteboarding allows for on-the-fly problem-solving and idea generation, reducing the need for separate tools or meetings.
Visual Learning: Visual aids help convey complex ideas more clearly, catering to different learning styles.
Remote Work Facilitation: Especially beneficial for remote teams, enabling seamless collaboration despite geographical barriers.
Documented Discussions: Whiteboard content can be saved for future reference, ensuring that valuable insights aren't lost.
Use Cases of Whiteboard:
Education: Teachers can explain complex topics visually, engaging students in interactive lessons.
Business Meetings: Teams can brainstorm strategies, visualize data, and plan projects together.
Design Reviews: Designers can share concepts and receive feedback in real time.
Technical Support: Support teams can troubleshoot issues by visually demonstrating solutions to customers.
Transform your React JS video call app into a dynamic platform for collaborative innovation, driving productivity and creativity to new heights. Follow the below tutorial and build a React JS Video Calling App with the Collaborative Whiteboard feature.
🚀 Getting Started with VideoSDK
To take advantage of the chat functionality, we must use the capabilities that the VideoSDK offers. Before diving into the implementation steps, let's ensure you complete the necessary prerequisites.
Create a VideoSDK Account
Go to your VideoSDK dashboard and sign up if you don't have an account. This account gives you access to the required Video SDK token, which acts as an authentication key that allows your application to interact with VideoSDK functionality.
Generate your Auth Token
Visit your VideoSDK dashboard and navigate to the "API Key" section to generate your auth token. This token is crucial in authorizing your application to use VideoSDK features. For a more visual understanding of the account creation and token generation process, consider referring to the provided tutorial.
Prerequisites and Setup
Before proceeding, ensure that your development environment meets the following requirements:
VideoSDK Developer Account (Not having one?, follow VideoSDK Dashboard)
Basic understanding of React.
Make sure Node and NPM are installed on your device.
Basic understanding of Hooks (useState, useRef, useEffect)
React Context API (optional)
Follow the steps to create the environment necessary to add video calls to your app. You can also find the code sample for Quickstart here.
Create a new React App using the below command.
$ npx create-react-app videosdk-rtc-react-app
🛠️ Install VideoSDK
It is necessary to set up VideoSDK within your project before going into the details of integrating the Screen Share feature. Installing VideoSDK using NPM or Yarn will depend on the needs of your project.
- For NPM
$ npm install "@videosdk.live/react-sdk"

//For the Participants Video
$ npm install "react-player"
- For Yarn
$ yarn add "@videosdk.live/react-sdk"

//For the Participants Video
$ yarn add "react-player"
You are going to use functional components to leverage React's reusable component architecture. There will be components for users, videos and controls (mic, camera, leave) over the video.
App Architecture
The App will contain a MeetingView component which includes a ParticipantView component which will render the participant's name, video, audio, etc. It will also have a Controls component that will allow the user to perform operations like leave and toggle media.
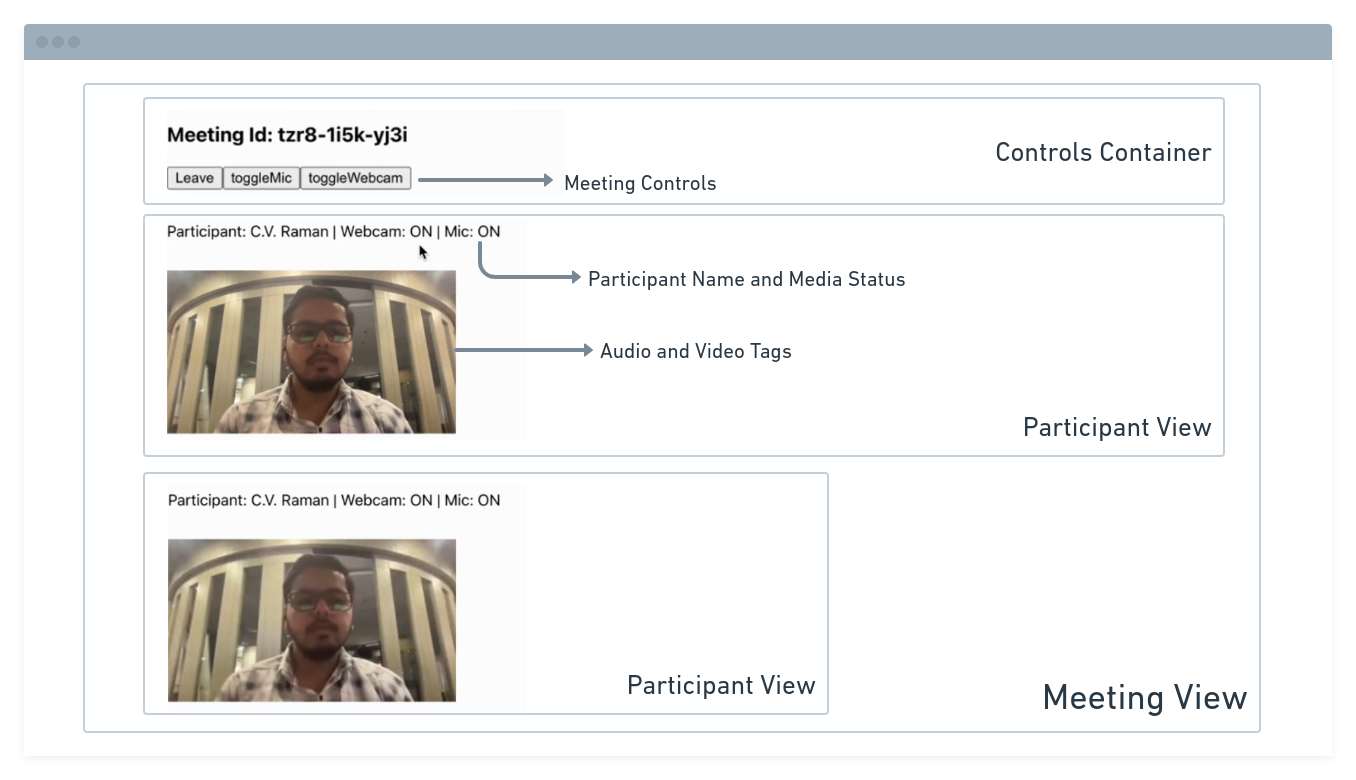
You will be working on the following files:
API.js: Responsible for handling API calls such as generating unique meetingId and token
App.js: Responsible for rendering
MeetingViewand joining the meeting.
🎥 Essential Steps to Implement Video Calling Functionality
To add video capability to your React application, you must first complete a sequence of prerequisites.
Step 1: Get started with API.js
Before moving on, you must create an API request to generate a unique meetingId. You will need an authentication token, which you can create either through the videosdk-rtc-api-server-examples or directly from the VideoSDK Dashboard for developers.
//This is the Auth token, you will use it to generate a meeting and connect to it
export const authToken = "<Generated-from-dashbaord>";
// API call to create a meeting
export const createMeeting = async ({ token }) => {
  const res = await fetch(`https://api.videosdk.live/v2/rooms`, {
    method: "POST",
    headers: {
      authorization: `${authToken}`,
      "Content-Type": "application/json",
    },
    body: JSON.stringify({}),
  });
  //Destructuring the roomId from the response
  const { roomId } = await res.json();
  return roomId;
};
API.js
Step 2: Wireframe App.js with all the components
To build up a wireframe of App.js, you need to use VideoSDK Hooks and Context Providers. VideoSDK provides MeetingProvider, MeetingConsumer, useMeeting, and useParticipant hooks.
First, you need to understand the Context Provider and Consumer. Context is primarily used when some data needs to be accessible by many components at different nesting levels.
MeetingProvider: This is the Context Provider. It accepts value
configandtokenas props. The Provider component accepts a value prop to be passed to consuming components that are descendants of this Provider. One Provider can be connected to many consumers. Providers can be nested to override values deeper within the tree.MeetingConsumer: This is the Context Consumer. All consumers that are descendants of a Provider will re-render whenever the Provider’s value prop changes.
useMeeting: This is the meeting hook API. It includes all the information related to meetings such as join/leave, enable/disable the mic or webcam, etc.
useParticipant: This is the participant hook API. It is responsible for handling all the events and props related to one particular participant such as name, webcamStream, micStream, etc.
The Meeting Context provides a way to listen for any changes that occur when a participant joins the meeting or makes modifications to their microphone, camera, and other settings.
Begin by making a few changes to the code in the App.js file.
import "./App.css";
import React, { useEffect, useMemo, useRef, useState } from "react";
import {
  MeetingProvider,
  MeetingConsumer,
  useMeeting,
  useParticipant,
} from "@videosdk.live/react-sdk";
import { authToken, createMeeting } from "./API";
import ReactPlayer from "react-player";

function JoinScreen({ getMeetingAndToken }) {
  return null;
}

function ParticipantView(props) {
  return null;
}

function Controls(props) {
  return null;
}

function MeetingView(props) {
  return null;
}

function App() {
  const [meetingId, setMeetingId] = useState(null);

  //Getting the meeting id by calling the api we just wrote
  const getMeetingAndToken = async (id) => {
    const meetingId =
      id == null ? await createMeeting({ token: authToken }) : id;
    setMeetingId(meetingId);
  };

  //This will set Meeting Id to null when meeting is left or ended
  const onMeetingLeave = () => {
    setMeetingId(null);
  };

  return authToken && meetingId ? (
    <MeetingProvider
      config={{
        meetingId,
        micEnabled: true,
        webcamEnabled: true,
        name: "C.V. Raman",
      }}
      token={authToken}
    >
      <MeetingView meetingId={meetingId} onMeetingLeave={onMeetingLeave} />
    </MeetingProvider>
  ) : (
    <JoinScreen getMeetingAndToken={getMeetingAndToken} />
  );
}

export default App;
Step 3: Implement Join Screen
The join screen will serve as a medium to either schedule a new meeting or join an existing one.
function JoinScreen({ getMeetingAndToken }) {
  const [meetingId, setMeetingId] = useState(null);
  const onClick = async () => {
    await getMeetingAndToken(meetingId);
  };
  return (
    <div>
      <input
        type="text"
        placeholder="Enter Meeting Id"
        onChange={(e) => {
          setMeetingId(e.target.value);
        }}
      />
      <button onClick={onClick}>Join</button>
      {" or "}
      <button onClick={onClick}>Create Meeting</button>
    </div>
  );
}
Output

Step 4: Implement MeetingView and Controls
The next step is to create MeetingView and Controls components to manage features such as join, leave, mute, and unmute.
function MeetingView(props) {
  const [joined, setJoined] = useState(null);
  //Get the method which will be used to join the meeting.
  //We will also get the participants list to display all participants
  const { join, participants } = useMeeting({
    //callback for when meeting is joined successfully
    onMeetingJoined: () => {
      setJoined("JOINED");
    },
    //callback for when meeting is left
    onMeetingLeft: () => {
      props.onMeetingLeave();
    },
  });
  const joinMeeting = () => {
    setJoined("JOINING");
    join();
  };

  return (
    <div className="container">
      <h3>Meeting Id: {props.meetingId}</h3>
      {joined && joined == "JOINED" ? (
        <div>
          <Controls />
          //For rendering all the participants in the meeting
          {[...participants.keys()].map((participantId) => (
            <ParticipantView
              participantId={participantId}
              key={participantId}
            />
          ))}
        </div>
      ) : joined && joined == "JOINING" ? (
        <p>Joining the meeting...</p>
      ) : (
        <button onClick={joinMeeting}>Join</button>
      )}
    </div>
  );
}
function Controls() {
  const { leave, toggleMic, toggleWebcam } = useMeeting();
  return (
    <div>
      <button onClick={() => leave()}>Leave</button>
      <button onClick={() => toggleMic()}>toggleMic</button>
      <button onClick={() => toggleWebcam()}>toggleWebcam</button>
    </div>
  );
}
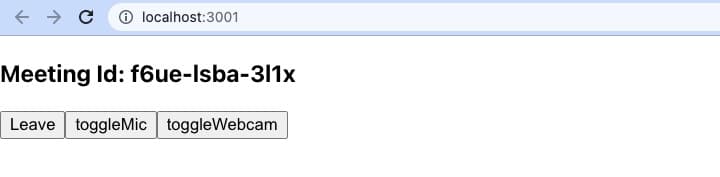
Control Component
Output of Controls Component
Step 5: Implement Participant View
Before implementing the participant view, you need to understand a couple of concepts.
5.1 Forwarding Ref for mic and camera
The useRef hook is responsible for referencing the audio and video components. It will be used to play and stop the audio and video of the participant.
const webcamRef = useRef(null);
const micRef = useRef(null);
Forwarding Ref for mic and camera
5.2 useParticipant Hook
The useParticipant hook is responsible for handling all the properties and events of one particular participant who joined the meeting. It will take participantId as an argument.
const { webcamStream, micStream, webcamOn, micOn } = useParticipant(
  props.participantId
);
5.3 MediaStream API
The MediaStream API is beneficial for adding a MediaTrack to the audio/video tag, enabling the playback of audio or video.
const webcamRef = useRef(null);
const mediaStream = new MediaStream();
mediaStream.addTrack(webcamStream.track);

webcamRef.current.srcObject = mediaStream;
webcamRef.current
  .play()
  .catch((error) => console.error("videoElem.current.play() failed", error));
5.4 ImplementParticipantView
Now you can use both of the hooks and the API to create ParticipantView
function ParticipantView(props) {
  const micRef = useRef(null);
  const { webcamStream, micStream, webcamOn, micOn, isLocal, displayName } =
    useParticipant(props.participantId);

  const videoStream = useMemo(() => {
    if (webcamOn && webcamStream) {
      const mediaStream = new MediaStream();
      mediaStream.addTrack(webcamStream.track);
      return mediaStream;
    }
  }, [webcamStream, webcamOn]);

  useEffect(() => {
    if (micRef.current) {
      if (micOn && micStream) {
        const mediaStream = new MediaStream();
        mediaStream.addTrack(micStream.track);

        micRef.current.srcObject = mediaStream;
        micRef.current
          .play()
          .catch((error) =>
            console.error("videoElem.current.play() failed", error)
          );
      } else {
        micRef.current.srcObject = null;
      }
    }
  }, [micStream, micOn]);

  return (
    <div>
      <p>
        Participant: {displayName} | Webcam: {webcamOn ? "ON" : "OFF"} | Mic:{" "}
        {micOn ? "ON" : "OFF"}
      </p>
      <audio ref={micRef} autoPlay playsInline muted={isLocal} />
      {webcamOn && (
        <ReactPlayer
          //
          playsinline // extremely crucial prop
          pip={false}
          light={false}
          controls={false}
          muted={true}
          playing={true}
          //
          url={videoStream}
          //
          height={"300px"}
          width={"300px"}
          onError={(err) => {
            console.log(err, "participant video error");
          }}
        />
      )}
    </div>
  );
}
You can check out the complete quick start example here.
Integrate Collaborative Whiteboard (Canvas Drawing)
When in a meeting, it can be very handy to draw and share your views with all the collaborators. To achieve this, you can develop a drawing board shared in real time using the publish-subscribe mechanism. If you are not familiar with the PubSub mechanism the usePubSub hook, you can follow this guide.
Implementing Collaborative Whiteboard
To implement the Whiteboard (Canvas Drawing) feature, you need to use a third-party library that provides an easy solution for drawing and rendering on the canvas.
- First, install all the dependencies.
npm i "@shawngoh87/react-sketch-canvas"
- With the dependencies installed, make a new
Canvascomponent which will be placed in theMeetingViewcomponent, and also add a basic whiteboard (canvas) to it.
import { ReactSketchCanvas } from "@shawngoh87/react-sketch-canvas";

const MeetingView = () => {
  return (
    <div>
      <WhiteboardView />
    </div>
  );
};

const WhiteboardView = () => {
  //Define a refernce for the canvas
  const canvasRef = useRef();

  //Define the props required by the canvas element used
  const canvasProps = {
    width: "100%",
    height: "500px",
    backgroundImage:
      "https://upload.wikimedia.org/wikipedia/commons/7/70/Graph_paper_scan_1600x1000_%286509259561%29.jpg",
    preserveBackgroundImageAspectRatio: "none",
    strokeWidth: 4,
    eraserWidth: 5,
    strokeColor: "#000000",
    canvasColor: "#FFFFFF",
    allowOnlyPointerType: "all",
    withViewBox: false,
  };
  return (
    <div>
      //Adding the actual canvas object
      <ReactSketchCanvas ref={canvasRef} {...canvasProps} />
    </div>
  );
};
With this, your canvas(whiteboard) is ready for drawing. If you draw something on your board, other participants won't be able to see those drawings yet. To share your drawings with others, use the
usePubSubhook. Get thepublish()method from theusePubSubhook for the topicWHITEBOARDto send your drawings to all the participants in the meeting.The data you need to send to all the participants is the strokes you are drawing, so you will send a stringified JSON to everyone in the message.
import { usePubSub } from "@videosdk.live/react-sdk";

const WhiteboardView = () => {
  //.. other declarations

  const { publish } = usePubSub("WHITEBOARD");

  // This callback from the canvas component will give us the stroke json we need to share
  const onStroke = (stroke, isEraser) => {
    // We will be setting the `persist:true` so that all the strokes
    // are available for the participants who have recently joined
    publish(JSON.stringify(stroke), { persist: true });
  };

  return (
    <div>
      <ReactSketchCanvas ref={canvasRef} onStroke={onStroke} {...canvasProps} />
    </div>
  );
};
- Even after publishing, the drawings won't appear to other participants because they need to redraw the strokes received from others. This involves handling the
onMessageReceivedevent and theonOldMessagesReceivedevent.
The data received in these events will be
stringified JSON, which need to be parsed before drawing.Additionally, to avoid redrawing the strokes created by the local participant, an extra check is implemented to determine whether the stroke was drawn by the local participant or not.
import { useMeeting,usePubSub } from "@videosdk.live/react-sdk";

const WhiteboardView = () => {
  //.. other declarations

  const { localParticipant } = useMeeting();

  const { publish } = usePubSub("WHITEBOARD", {
    onMessageReceived: (message) => {
      //Check if the stroke is from remote participant only
      if (message.senderId !== localParticipant.id) {
        canvasRef.current.loadPaths(JSON.parse(message.message));
      }
    },
    onOldMessagesReceived: (messages) => {
      messages.map((message) => {
        canvasRef.current.loadPaths(JSON.parse(message.message));
      });
    },
  });

  //This callback from the canvas component will give us the stroke json we need to share
  const onStroke = (stroke, isEraser) => {
    ...
  };

  return (
    <div>
      <ReactSketchCanvas ref={canvasRef} onStroke={onStroke} {...canvasProps} />
    </div>
  );
};
Congratulations! You've successfully integrated a whiteboard feature into your React.js video-calling application.
🔚 Conclusion
In conclusion, integrating a Collaborative Whiteboard into your React JS Video Call App enriches communication and collaboration experiences. By providing users with a versatile platform to brainstorm, illustrate ideas, and annotate documents in real time, this feature enhances productivity, fosters creativity, and facilitates seamless remote collaboration. Whether used in educational settings, business meetings, design reviews, or technical support sessions. Embrace this innovative feature today and enhance your video call app with a Collaborative Whiteboard from VideoSDK. Elevate your users' experience and drive success in diverse contexts.
To unlock the full potential of VideoSDK and create easy-to-use video experiences, developers are encouraged to Sign up with VideoSDK today and Get 10000 minutes free to take the video app to the next level.